Sunday, October 20, 2024

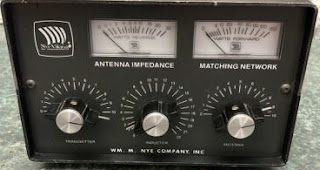
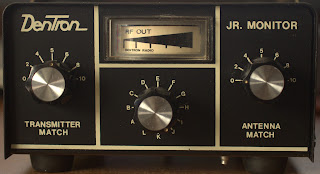
Dentron Jr. Monitor Manual, with Dentron addendum

                                                                        Manual

The file is scanned at 300 d.p.i. and google will not preview it in a browser window, you'll need to download it.

 I recently picked up one of these neat antenna couplers.  I've read about them and wanted to find one for myself.  My main interest is in comparing to MFJ and other cheap but expensive units.  

First thing I noticed is like all Dentron antenna couplers, much better quality in components and assembly.  


First there is more space between the inductor and cabinet. Second the plate spacing of the capacitors.

The one commonality that I have found with Dentron and MFJ is that the capacitor knobs are indexed backwards.  Minimum capacitance is 10 and maximum is 0.

I first noticed this when I purchased my first MFJ coupler. In over 30 years as a broadcast engineer and a technician before that I never saw minimum settings of anything at MAXIMUM and maximum setings at MINIMUM.  Except on MFJ and Dentron.  Maybe there are others, and I have not found them.

Maybe that is why MFJ and others tell people incorrectly how to set their antenna coupler.  Instead of maximum capacitance on 160 & 80, and about 75% of full capacitance on the mid bands, and 1/2 capacitance on 20 and above they just tell everyone to set them 1/2 way and let you be confused when you think your lowering capacitance by approaching 0 and increasing it as you approach 10; in reality you are doing the opposite.

Not only that if I would have designed machine control systems like that there would have not only been many confused operators and confusion on the production floor, hazardous operation would have been created.

As for the rest of the unit, I found what everyone else that posts on these notes, is in the design a second toroid was added for 160 meters.  That seems to be the weak link for 300W.  I don't like tiny wire.  If it ain't made to survive full rated power at A.M. it's junk.  I'm as stubborn that way as those who like to call MFJ mighty fine ......

In actuality, if it works it ain't junk.  Things that work, work.  Just some things are built to better quality standards than others.

For the Manual.  There seems to be only one .pdf of this manual on line.  No problem with that.  I post this one because my Jr. Monitor came with a manual.  The manual is a bit wrinkled, but it scanned ok.  

What I found interesting is that Dentron changed the initial settings with an added sheet. 

What else I found is that some of these units had the toroid and some did not.  Some of the units had the ground jumper for the toroid and some did not.  It also is not in a before or after certain serial number.  Search on line and you can find low serial numbers with the toroid and jumper binding post and higher serial numbers without.  I have not yet found any with the correct spelling on the label (MONITER).

So if you remove and reinstall the capacitor knobs the charts are null and void.  Anything Dentron states set to 0 just set to 10.  4 will become 6.  5 will stay 5.

As for operation, this thing works like a charm. I was able to match 80 through 10 on an end fed wire and on a dipole.  I could match 160 through 10 on my vertical.

Worst case SWR was 15:1 and 12.3:1 on the wire antennas measured with a RigExpert AA-55 Zoom.  Same antenna measurements after the Jr. Monitor match were all less than 2:1.

Vertical antenna worst SWR was  18:1 on 160m which matched 2.2:1 and 2.6:1 after the Jr. Monitor.  

Loss? I did not measure antenna current or field strength, but I did make CW contacts Friday and Saturday night to CA and OR as well as the U.K, Germany, and Italy all QRP.

I used 25W on SSB throughout the USA the same 2 nights.

Since MFJ has ceased production we may not get many new (only what is left in stock) MFJ anything, but for years there will be used on the market.

Saturday, June 29, 2024

2024 Field Day

I don't keep up with this blog.  There's a lot went on since my last post.

Radio restorations.

Vibroplex restorations.

Antenna experiments. 

And Field Day.

I didn't post anything from last year's Field Day.  

Seems each Field Day gets better with the peaking of the solar cycle.  I like running QRP rather than going to the club Field Day site or working Class 1D as I did one year.

This year I used a compromise antenna. During the day I used a hitch mount telescoping 18 foot vertical mounted on a Palomar 9:1 unun on a trailer hitch on my truck.

Saturday night I changed to a Sigma-Eurocomm SE HF-X80 vertical on a military mast hitch mount using the stock unun that comes on the antenna.

The HF-X80 did better on 80 Meters and even had low SWR across some of the 160 meter band although I do not use 160.

Soon after the start my PC quit.  Died.  R.I.P.  I did the event using paper logs rather than wasting time with a Windows PC which I think was a hardware failure  rather than the OS for a change, but not repairable in short time.


Yaesu FT-450AT set to QRP powered by a solar charged battery pack, and Ten-Tec 247 Antenna Coupler to match the antenna. 

Soon after the PC failed and I made a contact or two, we got rain.  I initially set up outside since I set up my portable QRP set up or another rig that I can reduce RF power to 5 watts output. Now I moved into the garage and set up on the work bench.

Saturday was fine for 5W phone.  Saturday evening I decided to try the HF-X80 and put it up.  Thunderstorms.  Took the antenna back down for safety and did not operate during the overnight storms.

Sunday I decided to use the HF-X80 since it would be the first time using this antenna.  I usually use a Mosley RV-4C with counterpoise since it is such an easy antenna to set up and use.  I wanted to try something different this year.


Solar panels and the HF-X80 installed on the hitch mount. Used a small board over the choke balun to protect the connectors from rain.  Yellow thing across side walk is a cable ramp to protect the coax and prevent tripping over the coax.


There was quite a bit of activity on Sunday and the set up performed better than expected.  Not as good as using a Mosley antenna, but good enough to score more contacts than 2023.

I monitored the Solar controller to see if it would ever switch to battery power since I did not operate at night this year.  I operated from about 1900 Saturday until 1800 UTC Sunday and never used any battery power; all solar.  Next year I may get a new set of panels that are not as large and still as powerful.

I like setting up and operating from outside.  Portable set up is fast and easy. Fresh air and sun and shade, but rain...that forces me into the garage.  Thundershowers and thunderstorms shut things down.


Tuesday, July 14, 2020

Front Yard Portable for Field Day 2020

It is an understatement to say Covid-19 has thrown a monkey wrench into the gear works for 2020 (and probably the next few years), but the stay at home orders have enabled many of us to get to projects we otherwise may have never done.

One of those projects for me was to use what I have and get on the air QRP for Field Day.  It has been something I've wanted to do ever since getting my license.

In Florida however, I had to many irons in the fire with the both local ham clubs and always worked Field Day with a club -- or two.


After trying different wire antennas, and trying to keep them hidden due to antenna restrictions I decided to give the Hy-Gain AV-18VS a go.

I only ordered it 2 weeks before Field Day.  It arrived about mid-week before Field Day.  Just enough time to get it ready.

I also located a Mosley RV-4C on Craigslist.  I checked it out.  The price was right.  I brought it home, cleaned it, replaced some of the CAD plated steel hardware with stainless steel, mounted it on a speaker stand and tested it.

Out of curiosity I wanted to see what the bands looked like without a counterpoise.  Bad.  Nothing under 2.5:1 VSWR except for a small part of 20 meters fell to about 2:1.  I did not expect it to do anything without radials; it's a vertical.

Four cut to band length radials were included with the antenna. I fastened them to the base and strung them out in the yard and over the wood railing of our deck and ramp.

All 4 bands less than 1.5:1 except 40 Meters.  The band ends increased to between 1.7:1 and 2.0:1 VSWR.  Still very useable, and nothing to adjust.

I decided to verify the bands and brought out my HP 4815A.  This showed resonance across most of the bandwidth of the bands.  I'll be doing some more analysis of this antenna and the AV-18VS once the weather cools.

What I like about Mosley antennas is their great quality and easy assembly.  I've used commercial Mosley antennas in the past, and the amateur radio antennas are just as high of quality.  The RV-4C is the only vertical that went together and on the air without tinkering with section lengths, trap adjustments, add radials, etc.  They work out of the box.

I set up in the yard until I had to move to the deck to get some shade.

Simple and quick set up. I used my IC-70kMKIIG on low power.

I operated QRP so what I got from the Icom is what I used.  Next highest power setting was 7 Watts.

Tower of Power.  A Mosley RV-4C on a speaker stand.  Orange flags are on the counterpoise wires.  Counter poise wires are suspended by attaching the ends to fiberglass driveway markers.

The tidiness did not last long.  By Saturday night I started collecting other things, and by Sunday morning this is what things looked like as soon after sunrise that I had enough light to take the image.
Overall this year's Field Day was quite a bit of fun. I did not make hundreds of contacts or thousands of points, but I did have fun.  To me and many of the hams I know that is what Field Day is about: Fun.  We all like to make as many contacts as possible and earn as many points as possible, but no need to make the week end a burden.

The AV-18VS was installed at the end of the yard behind the deck.  It would be to the top right of the RV-4C in the image of that antenna. I kept it retracted during the day and extended the sections only at night when I wanted to use 80 meters.

For power I used old handicap scooter 12 V, 18 AH batteries. I had 2 wired in parallel and they carried the entire week end.

I've had good results saving the batteries when they get changed out of my XYL's scooter and chair.  I worked several hurricanes in FL using only one 12V 12 AH battery and my HT.  I also worked several hurricanes with my jump kit on one 12V 18 AH batteries same as the two I used in the above image.  Usually a hurricane passes in about a day although one lasted about 3.  I had a generator, but batteries are much quieter. 

Saturday, July 11, 2020

Getting a Hy-Gain AV-18VS Ready For Field Day

Review of the AV-18VS is after the images.

I've never been active with this blog, and keeping to that tradition, it's been over 3 years since my last post.

Since the last post we moved from Florida to Michigan.  We chose a quick to purchase and occupy house that would be handicap accessible and we could pay it rather than mortgage one.

Our plans were to casually search for a house that fit our needs, and be in it in about 3 to 4 years or sooner.  Covid-19 put those plans on hold.

2020 was going to be our year.  We will wait.

Because of where we live I am restricted to what antenna I can install.

I worked Field Day 2018 from my home station with a multiband mobile antenna mounted on the rain gutter and grounded the down spout.

That arrangement at least got me on the air.

2019 Field Day I installed a random wire.  Bands were dead.  I planned to work QRP.  I did not do Filed Day 2019.

Field Day 2020.  Goal was all week end QRP on batteries.

I wanted to work 80 meters over night this year so I bought a Hy-Gain AV-80VS. Not much of an antenna and only about 1/16 wavelength on 80. I like messing with short verticals.  This antenna is also quite stealthy compared to the AP8A and many other 24 foot and taller verticals.

Not all that much to get a Hy-Gain AV-18VS put together and mounted on a metal pipe driven into the ground.  The coil is the problem.  See photos.

Out of curiosity I tried the antenna without radials.  As expected VSWR of 3:1 or greater on every band.

Clipped 4, 67 foot long radials onto the antenna base and laid them out in the yard.  Surprisingly most of 80 meters was 2.5 and under with a 1.3:1 dip at 3.25MHz to 3.60MHz.  Suits me.  The old Novice section of the band, and my CW is not all that good. If I do any CW I'll be fine.  The band from 3.60 to 3.75 was about 1.4 and 1.5:1.

I tweaked the antenna by moving the coil tap around and was able to move the VSWR dip a bit higher on the band.  I now had a 1.2:1 dip at 3.62MHz, and a useable 1.4:1 on the Novice frequencies.  I did not measure grater than 1.5 until 3.87Mhz and VSWR was still only 1.7:1 at 3.90MHz.  Plenty for what I expected to do on 80 for Field Day.

Sorry for the bit of blur.  The first thing about the Hy-Gain AV-18VS is the cheap quality.  I can live with the tubing, but the coil could be better built.  As it is if even the correctly sized clip were shipped with the antenna I'd be ok, but the clip is for size 14 wire and the coil is made of  16 or 18 gauge.  Time to order the correct, and much better quality, clips from DXE.  Both clips are screwed together tightly as possible.  DXE on left, Hy-GAin on right.

This is how the clip is properly attached.  No shorting adjacent turns, and fits tight to the turn to which it is clipped.

Good Quality DXE clip on the left. Poorly fitting MFJ clip  on the right.  MFJ owns Hy-Gain.  I am familiar with some pre-MFJ Hy-Gain antennas when the tubing was heavier and better quality parts were used.

Clip supplied with the antenna does not fit tightly no matter how hard the screw is tightened. It is also difficult to not short to an adjacent or both adjacent turns.  Compensation for shorting adjacent turns can be done by relocating the clip to a point where the antenna is resonant or low VSWR, but the clip must be able to be fastened tightly to work reliably.  The tip of the clip is not what is tightened to the coil. It is the part formed for the wire, and it is tightened as tight as possible.  It is loose enough it will fit the turn as seen.

DXE on the Left, HyGain on the right.  Notice the supplied clip shorts to both adjacent turns.
 On a different subject:
The AP8A top section got damaged by the movers. I bought a new tube from DXE, and some of the DXE Guy Line Caps.  I have not installed The AP8A, nor did I plan to use it on Field Day if the Hy-Gain worked.  The Hy-Gain arrived a few days before Field Day.  I had time to check it out.

DXE has much better quality tubing than even the original pre-MFJ Cushcraft tubing.  New top section DXE tubing is inside the next to the top section on the left.  The original AP8A top tube is on the right.  0.03" wall compared to 0.05" wall of the DXE. 
Back to the AV-18VS coil.  I worked with thousands of tapped inductors made from wire and flat edge wound on commercial A.M. transmitters, antenna base coupling units, and phasors.  So the el-cheapo Hy-Gain in a way was no surprise considering it is made for ham radio and by whom it is made.  Seems hams over pay for low quality equipment in many ways.  This coil could be made of heavier wire, spaced nicer, and the clip correctly sized for what the antenna costs.  As it stands this antenna should cost about $75.00, and perhaps even include shipping.

The tubing walls are thinner than that of my Cushcraft or Mosley verticals.  OK, they are taller so they need heavier walled tubing.  Still if the AV-18VS is permanently installed it must withstand wind and depending on location, ice.

The entire base could be better designed to house the coil, and several correct clips could be included with the antenna for easier band changing.

Alternatively the coil could be made like some of the old mobiles with plug in taps to jumper to the correct band.

Finally the base quality is very poor quality.  I worked with first day apprentice machinists that knew enough to break burrs, sharp edges, and smooth all rough edges on stamped metal parts.  None of that was done to this base.

First thing I did when I unboxed the antenna was see the unfinished base. I got one of my smooth files and removed all of the sharp edges and burrs from the base.  Next step was to clean all the holes with a de-burring tool.  Then I was ready to assemble the base. Everyone who does this should charge MFJ to complete the work their shop should be doing. I'm sure if we all charged them $50.00 to de-burr their bases they may ship quality product.

Assembly was simple and straight forward.

Finding the correct tap was easy.  Locations are approximated in the instructions and I found them not to be far off.

I did shorten the jumper lead and installed a DXE clip.  There is no need for the jumper to be as long as what is supplied.  Half as long is more than sufficient.

I only set the antenna for 80 meters.  Results were ok.  I did not work as long into the night as I planned.  Took a nap and resumed again about 0300 EDT Sunday.

Changes I plan for the AV-18VS is test is without the loading coil with my AH-2 which should match the antenna quite good on all bands to 40 meters.  I may need to add a top hat for 80 meters.

I also plan to place clips on the antenna coil as presently built.  I can use short clip leads to clip to the 80M tap and to which ever other band I choose.  The idea is to be able to field deploy this antenna for portable operation.

Meuller #45 clips work quite good for clipping the radials to the base and having a few short jumpers with one on each end can be used on the coil taps.  Rather than moving a clip, let the coil tap clip attached and use clip leads.

When the weather gets a bit cooler I'll do all the bands as well as add an SO-239 to the base. The base is already punched for one (Thanks MFJ/Hy-Gain).
The challenge is to neatly fish the coax through the base tube and out to the coil and base.  Could be as simple as a grommeted hole for RG-8X or an enclosure for the coil too.

Would I recommend the Hy-Gain AV-18VS?  Sure. Considering the cost of other antennas this one is ok if you don't mind manually changing bands. There are ways to work around that.  Those ways will need a post of their own.

Is the AV-18VS worth the price?  Well, those who know me know I'll say no because I think all amateur radio antennas except a few are way over priced.  So much so I have yet to purchase a new one except for the AV-18VS because it is perhaps the cheapest vertical on the market.  Cheapest price-wise, and the cheapest quality-wise I've seen.

Now speaking as strictly a ham radio operator. I know what is out there.  For the price you won't find another antenna this nice.  Put it together and put some radials on it and you have an antenna that will cover from 10 meters to 80 meters. No other antenna for $150.00 will do that.

The AV-18VS can be ground mounted, pole mounted with a counterpoise, or roof mounted with a counterpoise or tuned radials.

The AV-18VS is small enough to be easily raised and lowered in an antenna restricted location.  It may even be small enough to be left up ground mounted in the bushes or even the yard or on beside the deck, and there are probably other places.  As long as a few radials can be laid the antenna should work.

This is the kind of antenna one can experiment with.  Build your own coil and test it.  Add a top hat.  Instead of a top hat try adding a wire. Instead of radials, a counterpoise or a ground plane.

Beware though if you buy one (and maybe other Hy-Gain, Hustler, or Cushcraft antennas) be prepared to de-bur the base.

Sunday, January 22, 2017

Kenwood TS-830S Station.

I started my Kenwood station in 2010 with one of my dream radios, the TS-830S.
When I first got my General I searched for my first rig.  I did not know exactly what I wanted. I did like all the Kenwood line especially the TS-530 models since these were more in line with my budget.  I really liked the TS-830 from what I read and what I was told by local hams.

I saved some money and started shopping.  I bought my first rig in 2006, a Yaesu FT-101ZD. It did all I wanted.  It was owned my one of my Elmers.  It cost less than a Kenwood on line.  Even though I like the FT I still wanted a Kenwood.

In 2010 a friend who also was in the same radio club where I belong decided to sell his Kenwood TS-830S.  It only took me a few minutes to get to his house and try the radio.  A trip to the house for the money and I had my start to my dream station, a TS-830S.

After I became familiar with using this radio I decided to buy some of the other accessories with the intent to complete the Kenwood station.  I even hoped to get a TL-922.

I used this for SSB and CW with a straight key.  I have several straight keys that I use including a twin to the one I am including in the sale.

Here are more photos:
This is the entire station.  The black objects in plastic bags are original Kenwood riser feet.

TS-830S with optional KB-1 knob.  Not sure if it is a Kenwood or K4EAA.

Rear panel.  Kenwood does not have a way to decode the serial number for date of manufacture.
 Most of the date codes on the ICs are mid-1986.  Those are the only dates I could find.

Carrying handle is in great shape.  Does not make the radio work any better.  It does make it look better.


This is the scratch I mentioned in my for sale post on Ebay.

All the filters are installed and work properly.


AT-230 Top.  There is a small scuff mark.


More pictures are available on request via email showing output power.

I will also be listing more Kenwood amateur radio equipment as I have some duplicates of some of my equipment and some equipment not shown on the first photo.

73,
Bill

Saturday, December 31, 2016

Straight Key Night starts in only a few short hours

With the start of Straight Key Night 2016 draws to an end, and 2017 will just be starting.  Hope everyone has a

Happy New Year!

Sunday, December 18, 2016

Emergency Communications Part 3


HANDY TALKIE & BATTERY PACKS


I also have a 2 meter handy talkie as part of my response kit.
It was actually the first jump kit, if one could call it a jump kit, that I put together. The ammo can kit came later.
Originally I used an ICOM IC-2AT, but when I needed to upgrade to a CTCSS tone board I found a nice IC-u2AT with several battery packs and a drop-in charger for about the same price. I chose the micro-two. It has a tone board and enough memory channels to load all the local repeaters and it is very easy to use. Reliability? Well I will take this over my Yaesu VX-6R any day.
I like the Yaesu, but it will die mid-QSO due to the stupidity of Yaesu using a lithium battery pack. At least the radio could have been designed with a low battery warning and the battery properly monitored to alert the operator before dying. Yaesu is not the only company with this design; they all do the same.
One day I will build a battery pack for the Yaesu and then I might be writing how much I would choose the Yasesu. So even though I enjoy using the feature-rich VX-6R for emergency and reliable long-time communications I will take my old ICOM.
The problem with an older HT was finding a battery pack that used AA or other batteries that were readily field replaceable. I chose an alternative route. The IC-u2AT will operate from about 6 volts D.C. to 12 volts D.C. Try that with a modern lithium powered HT. I chose an alternate method and bought some AA battery holders from either JAMECO or PARTS EXPRESS These vendors also sell the power connector that will fit the radio.  Measure the one from the radio manufacturer to get the center pin dimension, the outside diameter of the barrel and the length of the barrel.
The Battery Packs: Two holders with 8AA batteries are used. The battery packs are wired in parallel.


I then wrap (hold) the 2 packs together by wrapping then with Gaffer's tape. Do not use duct tape! It'll ruin things. Then I secure the wire and cable that goes to the HT with another wrap of Gaffer's tape. Duct tape leaves sticky adhesive on everything.  Gaffer's tape is more flexible and, unless left on for years, does not leave residue.

The packs now fit a small arms ammo pouch that I bought at a local army surplus store along with a web A.L.I.C.E. belt. The entire cost without batteries about $20.00. I do not recommend leaving alkaline batteries in the packs all wrapped and in the ammo pouch for months on end.
Alkaline batteries have a tendency to leak and ruin things, especially Energizer batteries. I have used this set-up for one hurricane and 2 Field Days since I built it and never ran out of battery power.


 Here is the completed HT with batteries stored in the ammo pouch. The spare rubber duck and telescoping 1/2 wavelength antenna along with the tiger tail all fit into the pouch. There is even room for a speaker microphone in the pouch. I use a speaker microphone with this set although it is not in the photograph.


Here is the u2AT with the tiger tail installed on the rubber duck.


The last photo is my HF portable kit that doubles as an HF jump kit.
The microphone and key are kept in the lid. The power cord, a spare IEC power cord, ground wire, and a ground wire with large croc-clips on each end for ground as well as a DC to car battery cable set are all part of the kit. The shelf is made from 3/8 inch thick plywood and attached to the case by sliding it into 3/8 inch aluminum channel fastened to the case sides by 6-32 pan head machine screws. I threaded the channel to avoid the need for nuts. The machine screws are locked with Locktite.
On top of the shelf is the power supply/external speaker and Icom AT-150 automatic antenna tuner. Mounted below the shelf is an Icom IC-735 complete with internal keyer and all filters. External D.C. power connectors and RF connectors are on the right side.
Future plans are to add remote power control and a modification for QRP. Other than being a bit heavy the kit is quite transportable. Forced air cooling is handled by the internal fan for the IC-735 and the fan on the power supply. Not shown is the rear filtered opening for the fans, the a.c. power line filter (mil-spec), and the mounting of the power supply and ATU, both of which are mounted with plumber's pipe strap covered with heat shrink and formed to each of the enclosures.
The antenna can be any of my mast kits with a dipole or most often the 20 meter inverted-V. There is also an AB-1555/U outfitted with a top arm to deploy a G5RV as an inverted-V.
The HF kit idea came from the SATERN site and this article that also appeared in the May 2008 issue of QST magazine. I chose to make a VHF kit and HF kit rather than both together. This allows me to operate either one as a separate portable station or I can use both together. Weight becomes somewhat of an issue with the older gear and the size of the older gear also must be taken into consideration. Some fellows choose to use portable equipment racks and others make roller carts or dollies.
I will be adding some photos and more detail on the HF kit as well as alternate power sources. I have the normal gel batteries and some huge 12 volt gel cells that came from a commercial installation and a solar panel for QRP or charging the batteries used for the kits.
Please follow the link below for a good article on
EMMCOM TRAINING


ADDITIONAL ITEMS you may include in your or with kit:
Handy-Talkie with a tiger-tail. A tiger tail is a piece of wire about 19 to 22 inches long (length does not seem to be critical mine are about 19.250 inches long) with a method to fasten it to the base of the handy-talkie's antenna. See the photo above with one attached to my µ2-AT
I use a ring tongue terminal with a half inch inside diameter ring. Even with many modern ones with crappy SMA connectors a tiger tail can be adapted to use with the HT. Just use a smaller ring tongue terminal or a suitable alligator clip. I use SMA-BNC adapters on my VX-6R and suggest doing so so the HT can be used with standard antennas.
Weather Alert Radio. I like the Midland WR100. It is a sensitive, functional very affordable all hazard alert radio with battery back-up (or operation) and an external jack to trigger an external alarm if there is an alert. I use mine with the Midland 18-STR. This is a red strobe pre-wired for use with Midland's weather radios. I like it because I can keep the radio on alert and not be blasted by an audible alert since I have the WX radio beside by rig.
Writing supplies like Write-in-the-rain pad and pen.
I also have a brief case kind of electronics tool set that I used when I was doing broadcast work that I take with me to Field Day, portable operation, and would take for emergency work.
The tool kit may be more than many operators want to carry, but it has saved our operation more than once on Field Day since if something can go wrong it probably will at the most inappropriate time and the tool required to make the repair will not be on hand. I hope to have the tool. I may not have my o'scope with me, but I'll have the most needed tools and a good DMM.
A.R.E.S. field manual and your local S.O.P. and any other references.
A.R.E.S. ID and any other needed form of ID.
A photocopy of your license. I have one that is laminated in the kit in addition to my wallet copy (also laminated).
More later...
7May10
26 May 11
Since the original post on my site we weathered Hurricane Matthew in October 2016.  During the 8th & 9th the hurricane knocked out power for my QTH. I operated with this handy-talkie kit on one single battery pack as shown for the duration of both days.  I had the Yaesu VX-6R with 2 fully charged batteries set to monitor UHF, but I did not use it.  I also had a Baofeng UV-5R on its original battery pack fully charged that I used to monitor a second repeater and UHF. I used the UV-5R because the battery seems to last forever on this one. It (the battery) will out perform the Yaesu (not hard to do) any day.

After the storm passed Friday afternoon I put the HF kit on a large battery and raised my G5RV N.V.I.S. so I could monitor the NFL ARES frequencies.  This rig was not needed since by Friday night/Saturday the storm was gone.  Electric was back on for us at 07:30 Saturday.